This site uses cookies for better functionality, and to be able to continuously improve it.
There are only cookies to maintain the functionality of the site and Google ads.
This site uses cookies for better functionality, and to be able to continuously improve it.
There are only cookies to maintain the functionality of the site and Google ads.
Windows Tips & Tricks
»» 11.DEC.2013 / updated: 04.APR.2021facebook/twitter
VHDX Windows Hyper-V 3.0: Hyper-V (hypervisor) is a virtualization service, and introducing the change old VHD format with the new version under the name VHDX in Disk Management.
Some of the benefits:
Note: Hyper-V is built into Windows as an optional feature - there is no Hyper-V download.
Check the requirements:
1) - For Windows Hyper-V 3.0 virtual disk creation VHDX proceed as follows:
2) - Press Windows -Logo + R on the keyboard simultaneously, and type the command diskmgmt.msc in the Run window that appears, and then press Enter.

3) - Appears Disk Management in the top menu, click on Action. Here on Create VHDX.

4) - Change the settings as shown below. Of course, you can change the size to fit your needs. For setting other routes click Browse ...

5) - By the Browse ..., you can set the path of salvation. Windows Explorer appears. Click the small, down arrow, and select the file VHDx instead of VHD, and then add any name. Finally, click Save. With this we return to the illustration above, where click OK.

6) - Create the image VHDX. Few seconds.

7) - Scroll down to see the new drive virtual, tape still black, indicating that it is a partition "unallocated" uninitialized.

8) - For changes to take effect, restart the computer. (Click vain VHDX file saved per unit D:\, displays the error message "not initialized").
9) - Press Windows -Logo + R on the keyboard simultaneously, and type the command diskmgmt.msc in the Run window that appears, and then press Enter.
10) - Do not make any changes, click on OK button.

But that's still not enough. It should be noted that volume, and must be formatted as real drivers.
11) - Once initialized, small window disappears and opens the Disk Management window, click in the virtual disk, with black stripe, with the right mouse button, and from the pop-up menu, select New simple volumes ...

- 3-4 window will appear with different information, but click only the Next and then Finish button.
12) - After a while black banda currency is blue, indicating that it has been selected as a primary partition and assign a drive letter.

13) - Click on the blue bar with the right button of mouse, and choose Format.

14) - By default, recommended quick format. Do not change anything. Click Start.

15) - A window indicates that all data will be deleted. Ignored, as not yet contain any data virtual disk. Click OK. When you have finished formatting, as seen in the image, indicating that the disc is Primary Partition ...
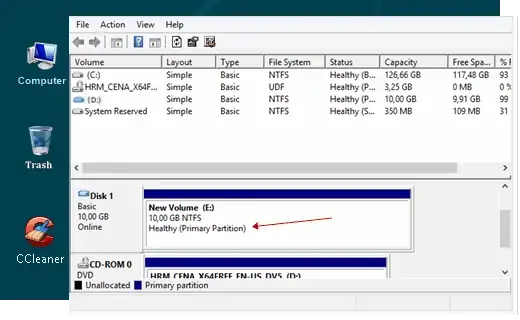
Finished. You can close the Disk Manager.
16) - Now, if you click on Computer on the desktop, including hard drives, will be visible and newly created virtual disk.

- There are two ways you can open the virtual drive.
Here we find with the saved name. (in our example: virtual.vhdx). Simply click the disk image file.

Just wrap with your favorite programs, images, videos, etc. Work as a unit like real.

Although you can encrypt with the BitLocker disk utility, built into Windows system, will you insure that no one else gets access to your files, there's no need to encrypt the entire drive, but this file VHDX.
END