This site uses cookies for better functionality, and to be able to continuously improve it.
There are only cookies to maintain the functionality of the site and Google ads.
This site uses cookies for better functionality, and to be able to continuously improve it.
There are only cookies to maintain the functionality of the site and Google ads.
Save the image to USB
»» 28.JAN.2018 / updated: ---facebook/twitter
If your computer or laptop does not start up, you can take a screenshot of the BIOS (not with a camera) and send it to an friend via another computer, for examine if the BIOS settings are correct, or simply to show for someone what BIOS have you on the computer
What you need: USB flash drive (or pendrive), the size does not matter, because only few images with the .BMP extension will be saved, max. 4-5 Mb.

Do as follows:
- Connect the USB flash drive (or pendrive) to the USB port on your computer or laptop
- If there is data, save it to the hard disk because it needs to be formatted
- Now format the flash drive into the FAT32 file system. NTFS is not good for BIOS
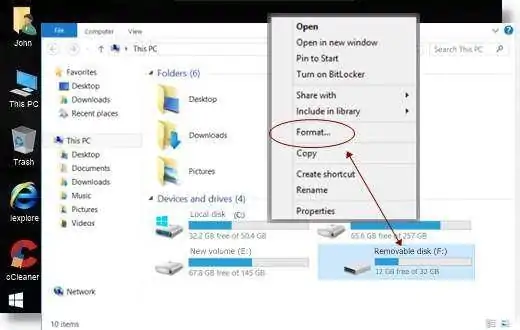
- Right-click on the flash drive in the "Devices and drives" window
- In the popup menu choose FORMAT link
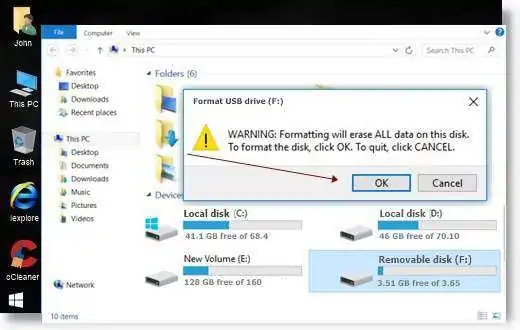
- In the new window, click on the small arrow down to select the FAT32 file system instead of the NTFS file system, and click on the START button

- A small warning window appears, that all data will be deleted. Click the OK button
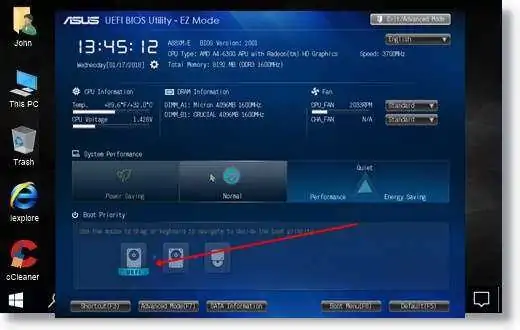
- Restart the computer and hold down F2 or DEL

- After inserting the BIOS, make sure the USB drive appears (I did not check but saved these images)
- The newer BIOS allows you to use not only the keyboard, but also mouse clicks
- To save a screenshot, press the F12 or Print Screen (PrntScr) key. (for me F12 worked perfectly)
- In a small window, you are asked to approve saving to the connected USB flash drive (or pendrive)
Press ENTER on the keyboard or click on the OK button

- Then save the images to the flash drive and store them with .BMP file extensions.
Ready. Press F10 on the keyboard to exit BIOS
The whole operation: restarting, connecting to BIOS, BIOS screen capture, and restarting the computer took just 4-5 minutes
- The BIOS images above are on the ASUS motherboard
- Images can be sent via Messenger, Facebook, or other compatible messaging software
- If your computer restarts and Windows is loading, you can see the images on your flash drive
If the computer does not start, or Windows does not load, you can use another computer, another laptop, or send it over the phone. In this case, the phone needs to be connected to the computer, or connect with USB flash drive (or pendrive) to the USB port of your phone or tablet, and if you have an Internet connection, you can send the image
END